How to Deploy a Machine Learning Model
Many of the Machine Learning articles you see online discuss the intricacies of models and how to properly apply them. Interesting and valuable as they might be, only a minority of these articles consider what happens after creating a model:
Which steps are needed to deploy a ML model?
Unfortunately, most articles I can find discuss how to quickly create an end-point using Flask but fail to realize that Flask by itself is hardly production-ready.
The very first thing you see when running Flask from the command line is the following:

Clearly, more needs to be done and considered in order to make it fully production-ready.
Things to consider when deploying a model
- Scaling your API
- Containerizing your API environment
- Documenting your API
- Retraining your model to avoid model drift
- Logging your API and model
- Cloud or on-premise?
In this article, we will together go through several steps into making your API ready for production, either locally or on the cloud with a focus on documentation, logging, and scaling.
We will be using FastAPI instead of Flask. This is not because there is anything wrong with Flask but I believe FastAPI can set you up quicker for production.
Document Structure
You can get all the data and files from here. For this guide make sure to structure your documents as follows:
.
├── app
│   └── main.py
│   └── sample.log
│   └── data
│         └── encoder.pickle
│         └── features.pickle
│         └── model.pickle
│
├── notebooks
│   └── preprocessing.ipynb
│   └── test_connection.ipynb
│   └── data.csv
│
├── requirements.txt
└── Dockerfile
This will help you to prevent errors, especially when creating the Docker container.
1. Preparing Files
The model that we are going to deploy is for predicting turnover. You can get the data here. The first few rows are shown below:

We start by loading the data and saving the names of the features that we want to use in our model. This helps in tracking the order of columns. You do not want to accidentally input values for Age when you meant Salary.
Next, since the columns Sales and Salary are categorical we are going to apply and save a One-hot Encoding instance. One-hot Encoding turns a column into n columns with either a 0 or 1 where n equal to the number of unique categories. I am doing this as it shows some additional complexity when deploying your model.
Finally, I use an out-of-the-box LightGBM Classifier to predict turnover. The model is saved so that it can be used in our API.
import pickle
import numpy as np
import pandas as pd
from lightgbm import LGBMClassifier
from sklearn.preprocessing import OneHotEncoder

# Load data and save indices of columns
df = pd.read_csv("data.csv")
features = df.drop('left', 1).columns
pickle.dump(features, open('features.pickle', 'wb'))

# Fit and save an OneHotEncoder
columns_to_fit = ['sales', 'salary']
enc = OneHotEncoder(sparse=False).fit(df.loc[:, columns_to_fit])
pickle.dump(enc, open('encoder.pickle', 'wb'))

# Transform variables, merge with existing df and keep column names
column_names = enc.get_feature_names(columns_to_fit)
encoded_variables = pd.DataFrame(enc.transform(df.loc[:, columns_to_fit]), columns=column_names)
df = df.drop(columns_to_fit, 1)
df = pd.concat([df, encoded_variables], axis=1)

# Fit and save model
X, y = df.drop('left', 1), df.loc[:, 'left']
clf = LGBMClassifier().fit(X, y)
pickle.dump(clf, open('model.pickle', 'wb'))
After we have prepared the data and saved all necessary files it is time to start creating the API to serve our model from.
NOTE: There are several methods for saving a model, each with its own sets of pros and cons. Aside from pickling, you can also use Joblib or use LightGBM’s internal procedure.
2. Production-ready API
Production typically means an end-point in the form of an API that the end-user can access. For python, many options are available such as Flask, Falcon, Starlette, Sanic, FastAPI, Tornado, etc.
FastApi
We will be using FastApi in the article for three reasons:
- Like Flask, you can set up an end-point with minimal code
- It is incredibly fast and its speed is on par with NodeJS and Go
- It automatically creates both OpenAPI (Swagger) and ReDoc documentation
This, however, is from personal experience and fortunately, you can easily change out FastApi for something else.
Uvicorn
We serve our FastAPI server with Uvicorn. Uvicorn is the ASGI server that allows for asynchronous processes compared to the more traditional WSGI servers. This will speed up the application and brings you closer to production-performance.
The API
First, we need to install both FastAPI and Uvicorn:
pip install fastapi
pip install uvicorn
After installing the necessary packages, we can start creating the main file. In this file, we make sure to load all the necessary files that we saved previously.
Then, we create a class called Data which defines all variables used in the model. This helps in tracking the variables that we use but also creates documentation based on the class that we made.
Lastly, we create the method for prediction. In this, the data is extracted and put in the correct order. One-hot Encoding is applied as we did previously. The prediction is then returned as either 0 or 1.
# Data Handling
import pickle
import numpy as np
from pydantic import BaseModel

# Server
import uvicorn
from fastapi import FastAPI

# Modeling
import lightgbm

app = FastAPI()

# Initialize files
clf = pickle.load(open('model.pickle', 'rb'))
enc = pickle.load(open('encoder.pickle', 'rb'))
features = pickle.load(open('features.pickle', 'rb'))


class Data(BaseModel):
    satisfaction_level: float
    last_evaluation: float
    number_project: float
    average_montly_hours: float
    time_spend_company: float
    Work_accident: float
    promotion_last_5years: float
    sales: str
    salary: str


@app.post("/predict")
def predict(data: Data):

    # Extract data in correct order
    data_dict = data.dict()
    to_predict = [data_dict[feature] for feature in features]

    # Apply one-hot encoding
    encoded_features = list(enc.transform(np.array(to_predict[-2:]).reshape(1, -1))[0])
    to_predict = np.array(to_predict[:-2] + encoded_features)

    # Create and return prediction
    prediction = clf.predict(to_predict.reshape(1, -1))

    return {"prediction": int(prediction[0])}
Now that we have everything in order, we can load the server with the following command from your console:
uvicorn main:app
main refers to the name of the file (main.py) whereas app refers to the name of the FastApi instance in main.py. If everything works as intended, you can see the server running at http://127.0.0.1:8000.
To test whether it gives a prediction back, you can run the following code:
import requests
to_predict_dict = {'satisfaction_level': 0.38,
                   'last_evaluation': 0.53,
                   'number_project': 2,
                   'average_montly_hours': 157,
                   'time_spend_company': 3,
                   'Work_accident': 0,
                   'promotion_last_5years': 0,
                   'sales': 'support',
                   'salary': 'low'}

url = 'http://127.0.0.1:8000/predict'
r = requests.post(url,json=to_predict_dict); r.json()
You can also test the API with Postman, which is a great tool for API Development.
Although your API can technically now be used in production, it would be helpful to include documentation, log what happens in your API, and to containerize your solution.
3. Documentation
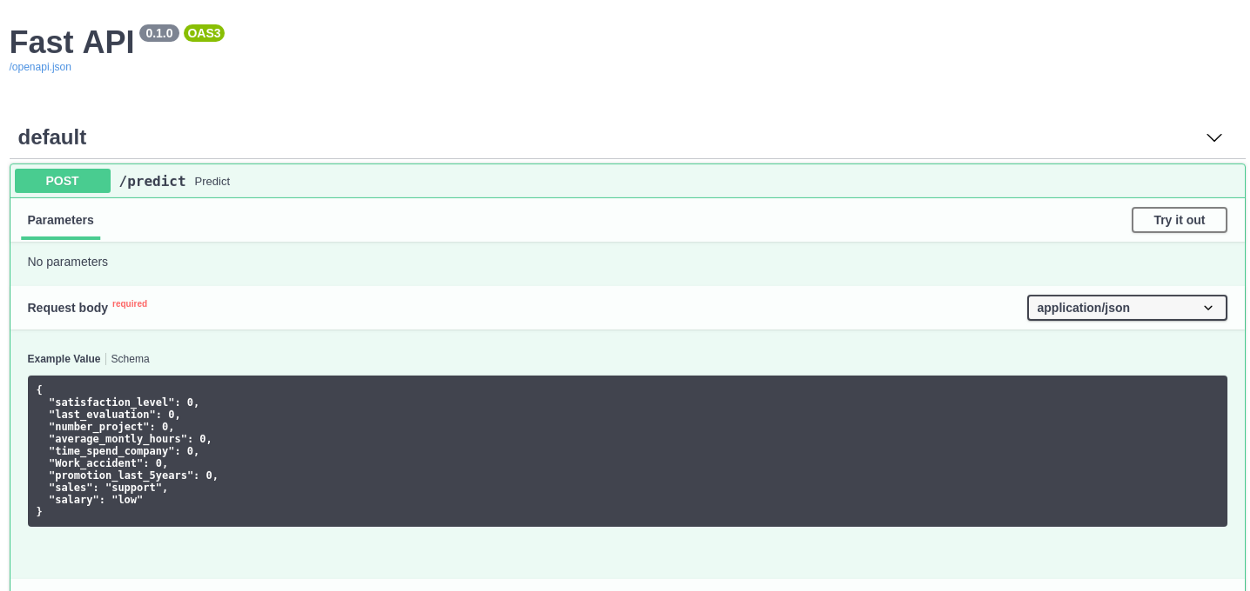
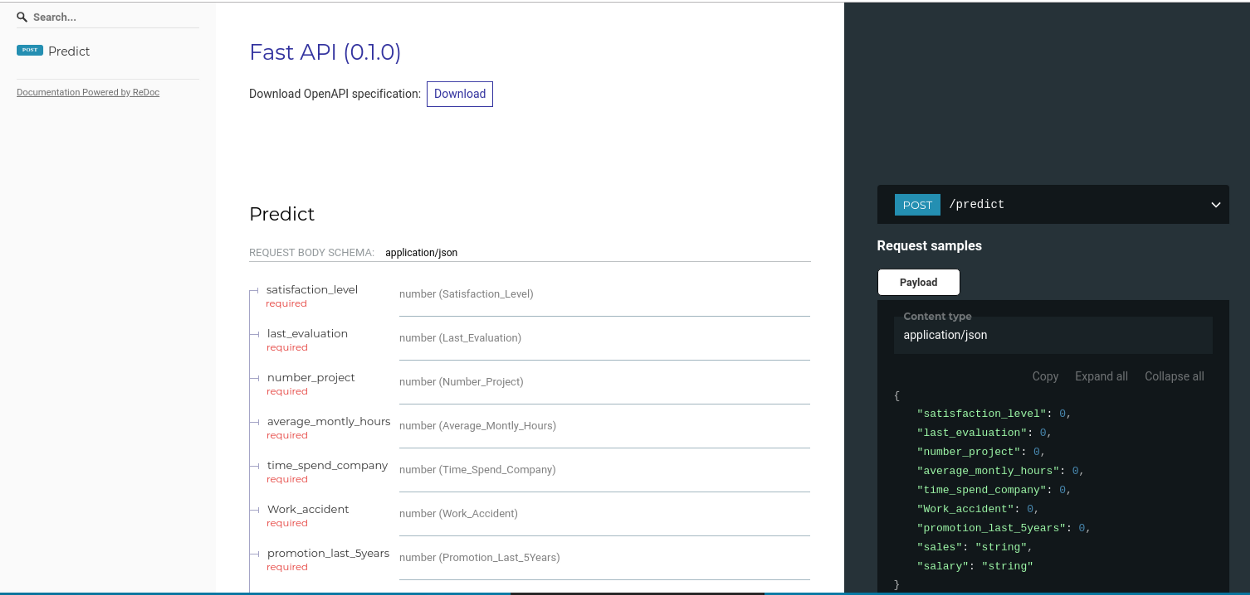
There is a good chance that you will not be the one to implement the API in existing services. It would then be nice if you document the end-point so that it can be used without any difficulties. Fortunately, FastApi automatically creates documentation based on the Data class that we made before.
FastApi has to methods for automatic documentation build-in: OpenApi (Swagger) and ReDoc.
OpenApi
After starting your FastAPI server you can go to http://127.0.0.1:8000/docs to see the documentation of your server automatically generated. You can even press “try it” to see if the server works as intended.

ReDoc
Like OpenAPI/Swagger, ReDoc generates reference documentation. It extends upon them by allowing you to create a highly-customizable react-based template. FastAPI creates the documentation automatically at http://127.0.0.1:8000/redoc.

NOTE: You can check out http://redocly.github.io/redoc/ if you want to see an extensive live version of ReDoc.
4. Logging
I have seen many people using the print() statement to track what is happening inside their code. That’s okay for small applications, but when you are switching between Development, Testing, Acceptance, and Production (DTAP) you might not want to show the same messages.
This is where logging comes in. It allows you to set a certain level of logging for an application and only show the messages if it exceeds that level.
Our API would benefit from logging for two main reasons:
- We can track if the API is still working and which problems it runs into
- We can track the input of the model and review its performance
It would be very interesting if we were to keep all input data to analyze it further. This would give us information on data we had not seen before previously and might improve the model.
Logging Levels
Some errors might be less interesting than others. In production, you might want to show fatal errors and not information on the progress of the application. This might be different when you are debugging the application.
To solve this problem, we can make use of levels of logging:
DEBUG— Information useful when debugging an application. Value = 10INFO— Information on the progress of the application. Value = 20WARNING— Information about potentially harmful situations. Value = 30ERROR— Information about errors that might be non-fatal. Value = 40CRITICAL— Information about severe and fatal errors. Value = 50
If we were to set the logger at a WARNING level, then only WARNING, ERROR, and CRITICAL would be shown.
Local Logger
To use the logger locally, we initialize the logger and set its minimum level:
import logging
app = FastAPI()
# Initialize logging
my_logger = logging.getLogger()
my_logger.setLevel(logging.DEBUG)
The minimum level is now set at DEBUG which means that essentially all levels of logging will be shown. When you bring your model into production, I would advise you to set it to WARNING.
To use the logger, simply call it and specify the level of logging. The message will then be printed to the console:
my_logger.error("Something went wrong!")

Now, you might want to save the logging to a file. To do this, simply put this statement instead of the setLevel above:
logging.basicConfig(level=logging.INFO, file='sample.log')
5. Using Docker
Now that we have an API to deploy we might want to containerize the application using Docker. Docker containerizes your app and all its dependencies to ensure it works seamlessly in any environment. This makes it easier to deploy your application across environments without much additional integration steps.
Start by making sure that you have Docker installed. Since we want to have a stable application across environments it is important that we also specify a requirements.txt for the application.
Next is creating the Dockerfile itself needed to run a contained version of our API. Fortunately, the developers of FastAPI have created python images that allow for proper environments to run FastAPI in:
FROM tiangolo/uvicorn-gunicorn:python3.6-alpine3.8

# Make directories suited to your application
RUN mkdir -p /home/project/app
WORKDIR /home/project/app

# Copy and install requirements
COPY requirements.txt /home/project/app
RUN pip install --no-cache-dir -r requirements.txt

# Copy contents from your local to your docker container
COPY . /home/project/app
Save the code above in a Dockerfile, navigate to the folder and run the following command:
docker build -t myimage ./
docker run -d --name mycontainer -p 80:80 myimage
This will build and run the image that we have specified in the Dockerfile.
Your API is now ready and can be accessed from http://127.0.0.1/docs.
Conclusion
In this (somewhat) comprehensive guide, we have gone through 5 steps of creating an API for your model and containerizing the application. You can now choose to host it locally or deploy the Docker via cloud solutions such as AWS or Azure.
Note that I tried to make this as comprehensive as possible while including subjects that I thought to be important. However, some more advanced topics have been excluded such as:
- Dealing with Concept Drift
- Securing your API
- Configuring the Gunicorn server
- Creating separate Dockerfiles for different stages (DTAP)
- Automatically retrain your model using CI/CD
- Using Kubeflow with Kubernetes to simplify production
- Etc.
All code can be found here.